In this part we deploy our Nix configuration to a VPS on Vultr and setup a github action to deploy our static site when we make a change.
- Deploy a new server instance
- Pick a plan
- Choose a location
- In a new tab, navigate to the upload ISO page
- Copy the link to the latest ISO (I use the minimal image), paste it and click upload

- Select that ISO you just uploaded
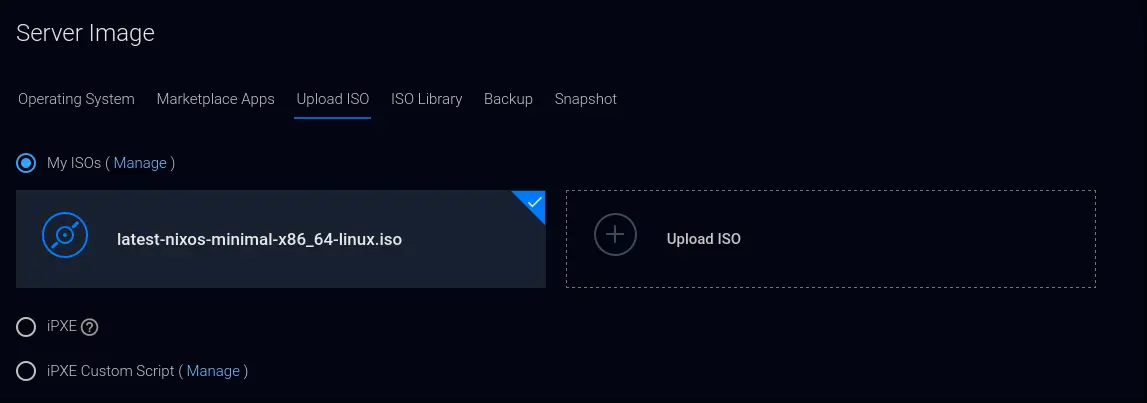
- Finish the rest of the steps and click "Deploy now"
- After the server finishes setting up, press the "view console" button to get into a terminal
Preparing the installation
This section is roughly the same as the VM setup in the previous part with some small tweaks regarding the specifics of Vultr.
Become root:
sudo su
The partitioning on Vultr is different because of the following:
- Vultr uses BIOS instead of UEFI
- No boot drive is needed
- Since I use a small instance, swap space is added to make the installation work
parted /dev/vda mklabel msdos
parted -- /dev/vda mkpart primary 1MiB -GiB
parted -- /dev/vda mkpart primary linux-swap -1GiB 100%
parted /dev/vda quit

mkfs.ext4 -L ROOT /dev/vda1
mkswap -L SWAP /dev/vda2
swapon /dev/vda2
mount /dev/disk/by-label/ROOT /mnt
The rest is the mostly same as in the last part.
nixos-generate-config --root /mnt
nix-shell -p git
git clone https://github.com/wjehee/.dotfiles-nix
cp /mnt/etc/nixos/hardware-configuration.nix .dotfiles-nix/hosts/HOSTNAME/
Perform the install, this may take a while.
cd .dotfiles-nix/
git add .
nixos-install --flake .#HOSTNAME
Copy the configuration onto the installed version
cd ..
cp -r .dotfiles-nix /mnt/home/admin
- Change into the installed version by running:
nixos-enter - Change ownership of .dotfiles-nix:
chown -R admin:users home/admin/.dotfiles-nix - Set the password for the admin user:
passwd admin - Create the user file for radicale:
htpasswd -B -c /etc/radicale-users USERNAME - Optionally create more calendar users, by running:
htpasswd -B /etc/radicale-users USERNAME - Run
exitto leave the installed version - In the Vultr UI, go to settings > custom ISO and remove it, this will reboot the server
Setting up CI
Use the following template github action with some small changes:
name: CI
run-name: Zola blog deployment
on:
  push:

jobs:
  build:
    runs-on: ubuntu-latest
    environment: deploy
    steps:
      - name: Checkout the current branch
        uses: actions/checkout@v3

      - name: Initialize the ssh-agent
        uses: webfactory/ssh-agent@v0.4.1
        with:
          ssh-private-key: ${{ secrets.SSH_PRIVATE_KEY }}

      - name: Install Zola
        run: sudo snap install zola --edge

      - name: Build the website
        run: zola build

      - name: Scan the host key
        run: mkdir -p ~/.ssh/ && ssh-keyscan -H $DEPLOY_SERVER >> ~/.ssh/known_hosts
        env:
          DEPLOY_SERVER: ${{ secrets.DEPLOY_SERVER }}

      - name: Deploy the website
        run: >-
          rsync -avx --delete --exclude '.ssh' public/ $DEPLOY_USERNAME@$DEPLOY_SERVER:/var/www/SITE_NAME
        env:
          DEPLOY_SERVER: ${{ secrets.DEPLOY_SERVER }}
          DEPLOY_USERNAME: ${{ secrets.DEPLOY_USERNAME }}
Create a new SSH key pair for this github action
ssh-keygen -f ~/.ssh/deploy
Press enter twice to not set a password.
On Github, go to the settings of your static site's repository > Environments.
Create a new environment, name it 'deploy' , then add 3 secrets as follows:

- DEPLOY_SERVER: the IP address of your VPS
- DEPLOY_USERNAME: admin
- SSH_PRIVATE_KEY: contents of the newly created SSH key at ~/.ssh/deploy
Then, in the configuration file on the server, add the contents of ~/.ssh/deploy.pub as follows:
users.users = {
	admin = {
		isNormalUser = true;
		extraGroups = [
			"docker"
		];
		openssh.authorizedKeys.keys = [
			"SSH KEY FOR LOGGING IN"
			"ADD NEW SSH KEY HERE"               # insert ~/.ssh/deploy.pub contents here
		];
	};
};
Then rebuild the server.
Lastly create a folder named after your static site and change the owner to the admin user:
doas mkdir -p /var/www/SITE_NAME
doas chown admin:users /var/www/SITE_NAME
Now, whenever you push to the repository containing your website, it will automatically update your website to reflect the changes.